M.ENG. Project
M.ENG. Progect is a training project for every Cornell 2M.ENG. student which lasts one year. My project name is Forte which is a startup focus on next generation gym wristband.
Last year, this program starts. During the last year, the former team was solving one problem. This year, we used one semester to solve the problem they didn't solve last year. So, we got a A+ for our project in the first semester.
Demonstration Video(Because the difference update rate between the camera and the displayer, we can see there are some shadow in the video. Actually the effect is really good!)
Introduction
In Forte, we need to build a wristband prototype which can automatically detect the weight of the dumbbell. We have already achieved this function. In next step, we need to add more functions on this wristband and reduce the size of the prototype.
Project Objective
We are making a smart wristband which not only allows the company to effortlessly track workouts and motion but also maps different movements to specific activities (i.e. mapping bicep curls, bench presses etc).
Design
We need to design a wristband to automatically detect the weight of the dumbbell. Based on this demand, we did lots of researches and finally gave three technical plans to our clients.
1. Put the reader on the dumbbell and put the passive receiver on the wristband.
This plan was denied because we need to charge each dumbbell which is too costy and complex and that's not what our client want.
2. Put a sensor on the dumbbell and a sensor on the wristband. Both sensors can connect to the internet. And we will pair the user and the dumbbell according to the time when the sensor is triggered.
This plan was denied because the whole system is too complex.
3. Put the reader on the wristband and the receiver on the dumbbell.
Finally, we accept this system. We decided to use the RFID technology to achieve the function of our product.
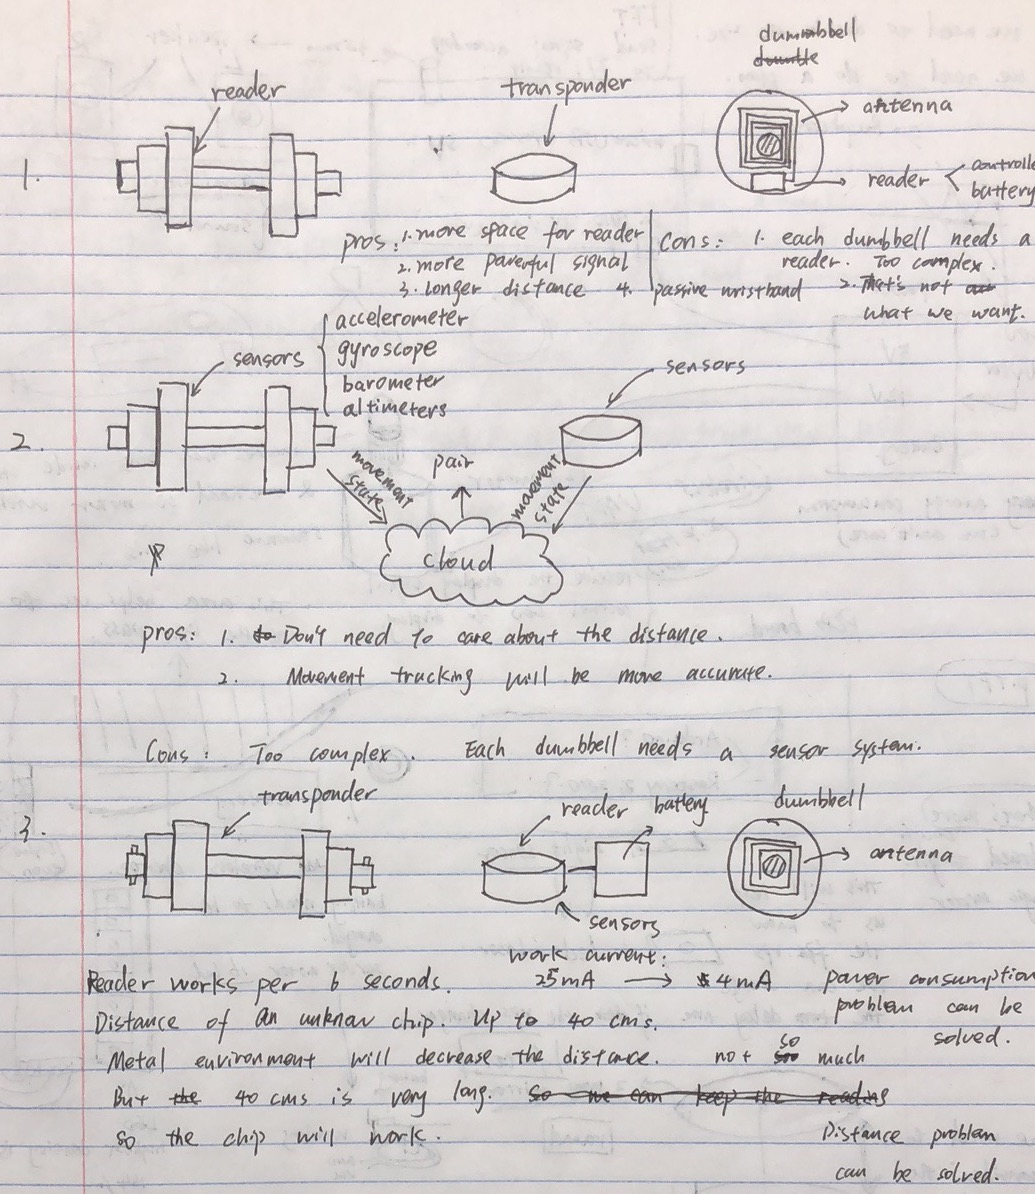
Figure 2: the draft of the plans
RFID System
We will need the RFID technology to identify the weight of the dumbbell.
RFID system includes two parts, the first part is the reader and the second part is the receiver.
The reader
The reader will generate the electromagnetic wave and read the signal sent back from the receiver. There are many kinds of reader. They are different in the frequency and the detect range(which is equal to signal magnitude). According to our demands and after doing many researches, we choose the RFID chip from a Chinese company which has a reading distance up to 40 cms.
The reader signal is influenced by the environment(humidity, metal) the relative angle between the reader and the receiver and the antenna. We focused on these three factors and give the solvements to our clients.
1. For the environment, we did some researches and some expeiments. We found the metal environment will significantly reduce the reading distance of the reader. But if we insert some insulation between the metal and the RFID tag the distance will increase a lot. So, we can insert some insulation material between the tag and the metal.
2. For the orientation, we did some experiments and found the reading distance will not decrease significantly. So, it will be OK if our reader wants to read the signal from different directions.
3. For the antenna, we did some researches and experiments. We can roll our own antenna. The antenna will emit much stronger signal after a good tuning.
Based on the above researches, we built a really good RFID reading system which can read from 17cms away with a 7cm-diameter round antenna.
As for the antenna, we tuned the antenna by ourself. Because we cannot find an antenna with a proper size. We used oscilloscope to tune the antenna and used a 3D-printing model to help us to roll the antenna. The effect of the antenna is really good. We got a 140 VPP output signal from the reader output.
Reading System Demonstration Video
The receiver(RFID Tag)
The tag will receive the signal generated from the reader and the circuit in the tag will transfer part of the electromagnetic wave to power the chip inside the tag. And the chip inside the tag will generate the electromagnetic wave. And the reader will read the signal generate from the tag. So, a complete communication ends.
For our project, we used the EM4100 thick card(thick card is easier for us to take the circuit out~). And becasue we will stick it on the back of a dumbbell. We need to care about the metal environment as discussed above. We just inserted some insulated materials between the card and the dumbbell. So our reader system is completed.
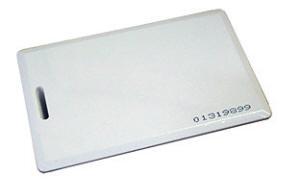
Figure 3: the EM4100 card
Microcontroller
RedBear Duo
We want to achieve wirelessly detecting the dumbbell weight so we need to use microcontrollers with BLE module. We just want to verify the idea so we choose a module on the market to develop the wireless function. We choose to use the RedBear Duo to be our microcontroller because I am familiar with this mcu and can easily send and receive the data on portable device like mobile phone.
I use the BLE library to read in the card number. And according to the datasheet of the EM4100. I decoded the card number and displayed it on the console.
Testing & Redesign
Testing
Firstly, we test our RFID system. The RFID worked really well. We put the antenna on our wirst to imitate we are wearing a wristband. And the distance is enough to read the tag on a metal dumbbell. Because our RFID chip doesn't have a anti-conflict system, So, we need to test the RFID conflict, the reading range is proper to avoid the RFID conflict. When we put two tags on different dumbbell. We can read out the right answer.
Then, we connect the RFID system and the microcontroller together. We powered the RFID system by usign the AA batteries(because this kind of power is the purest, we will develop a smaller power supply system by using the charge pump. )And we powered the microcontroller by using the Li-ion battery. We use the UART to read in the data and decode the data. And we give different card ID different weight. So, we can know the weight of the dumbbell from the card ID. At last, we print the data on the console.
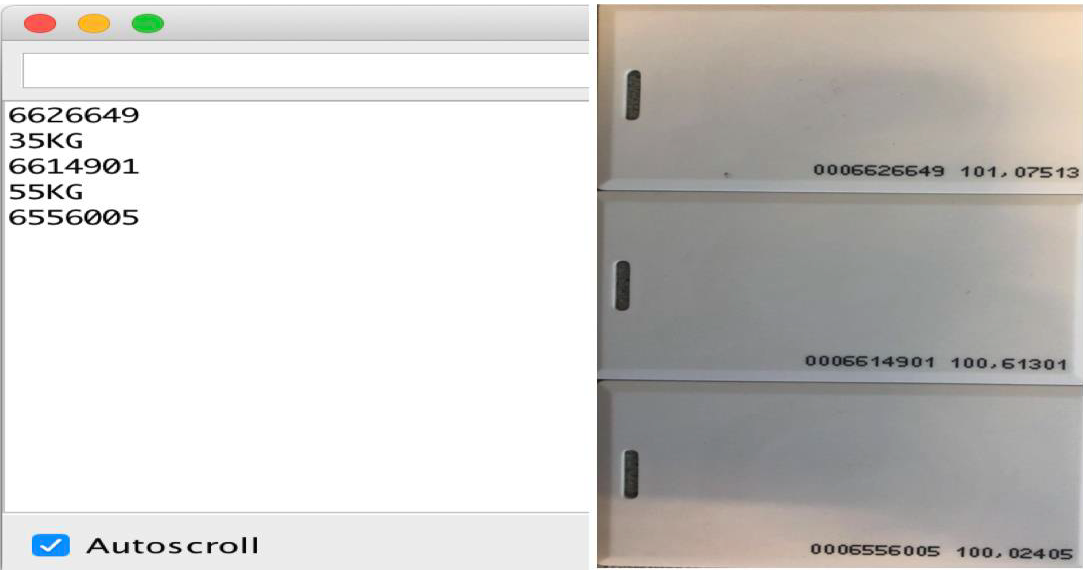
Figure 4: reading the card ID
And we developed the wireless program to send the data to the mobile phone. Now, we finished a embedded dumbbell detector prototype.
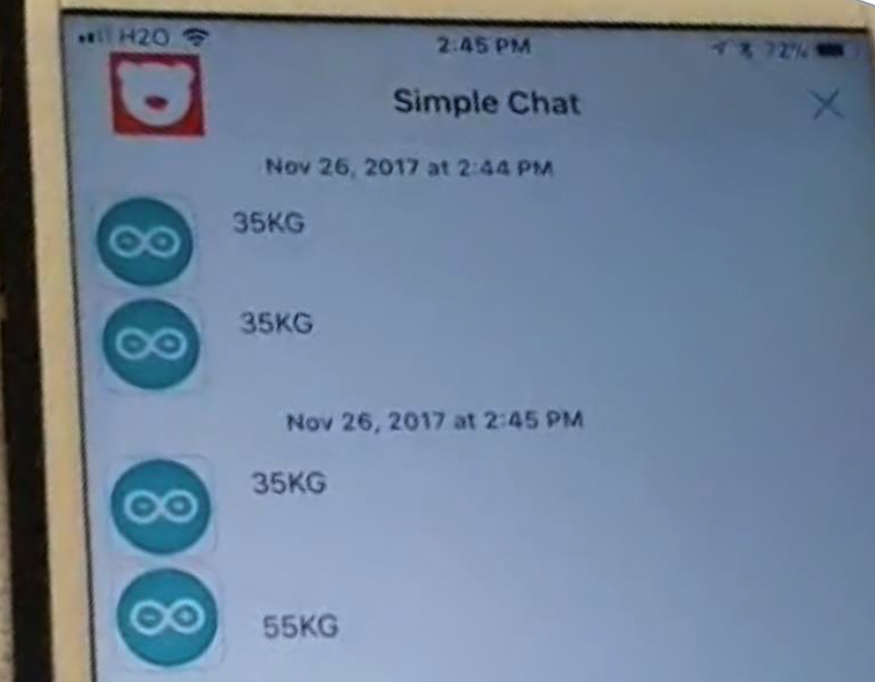
Figure 5: wireless test result
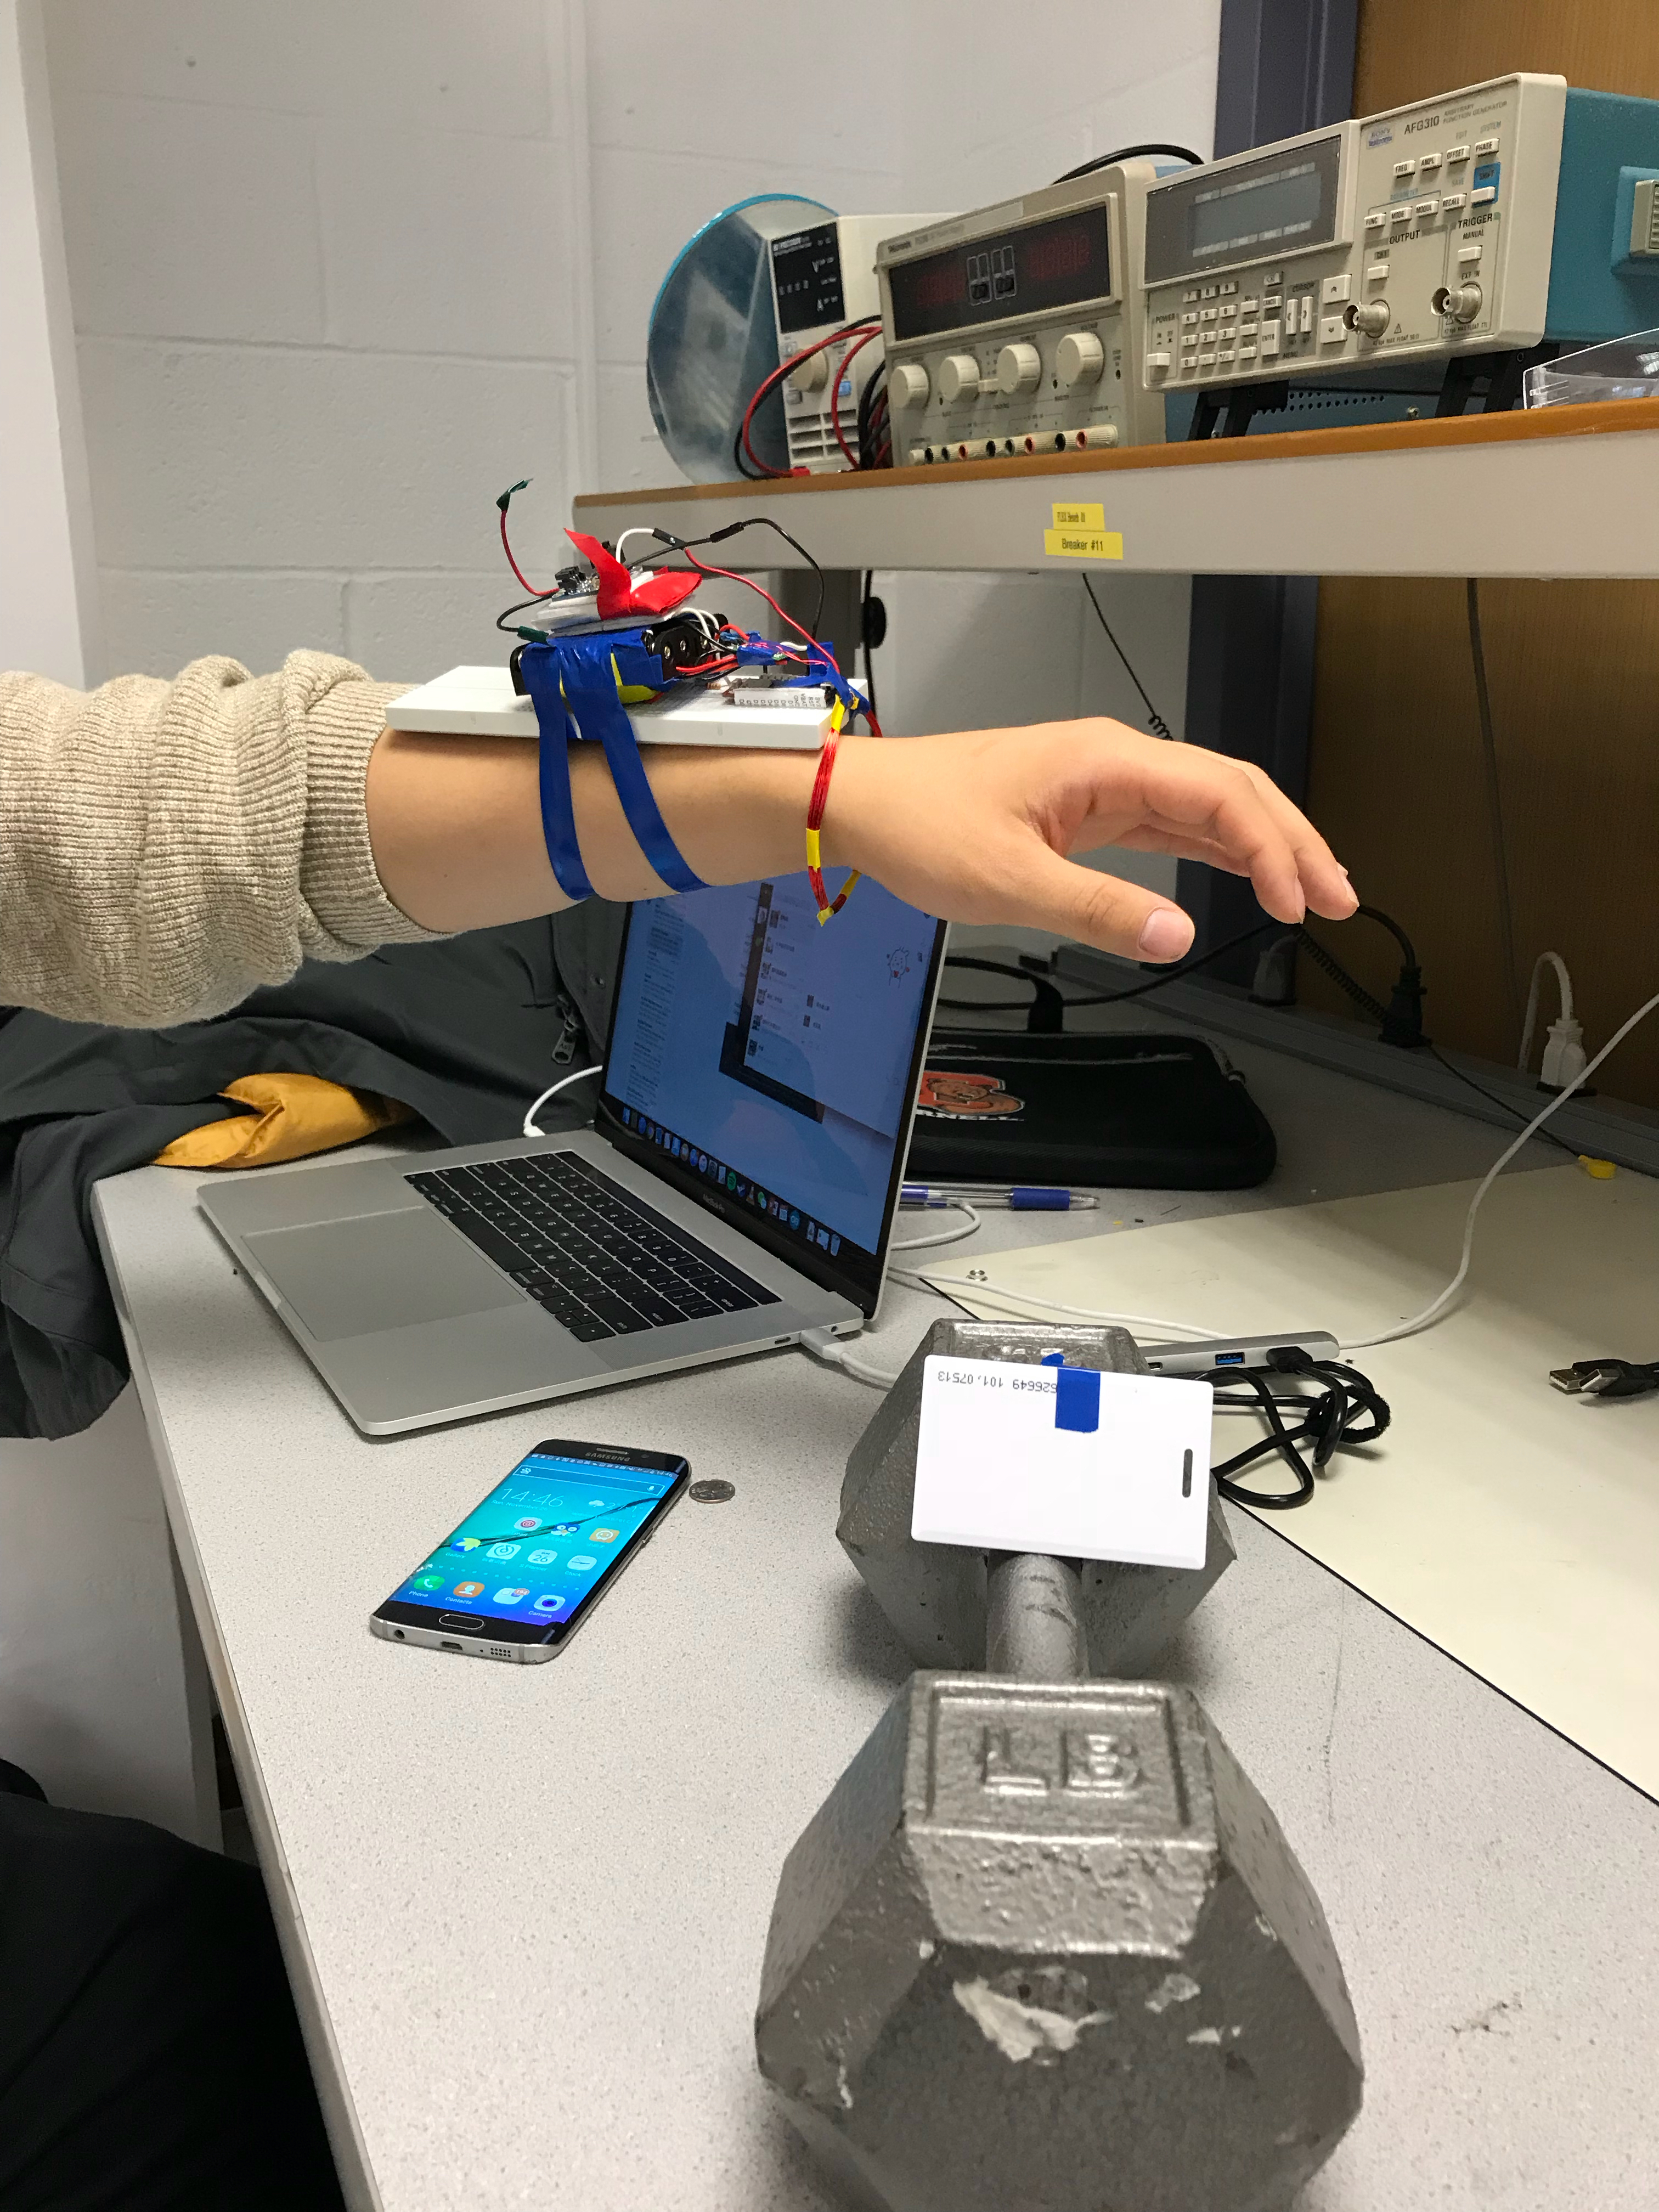
Figure 6: the whole system
In the second semester, we increased the wristband reading distance by isolating digital power and analog power. Taking advantage of longer detecting distance, we change the wristband geometry in a wearing friendly way as shown in Figure 7 and Figure 8.
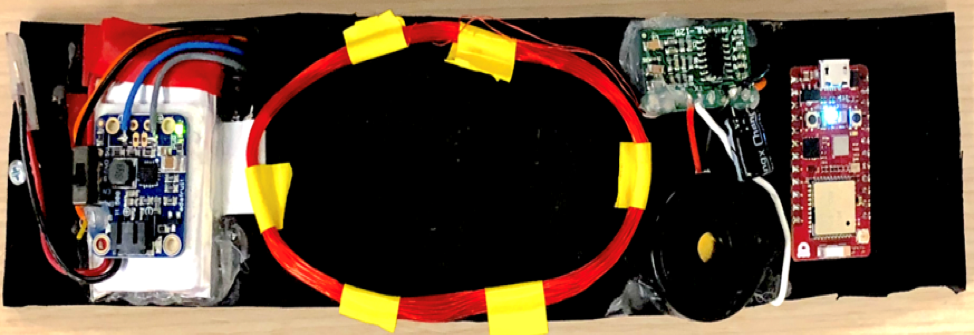
Figure 7: wristband with new geometry
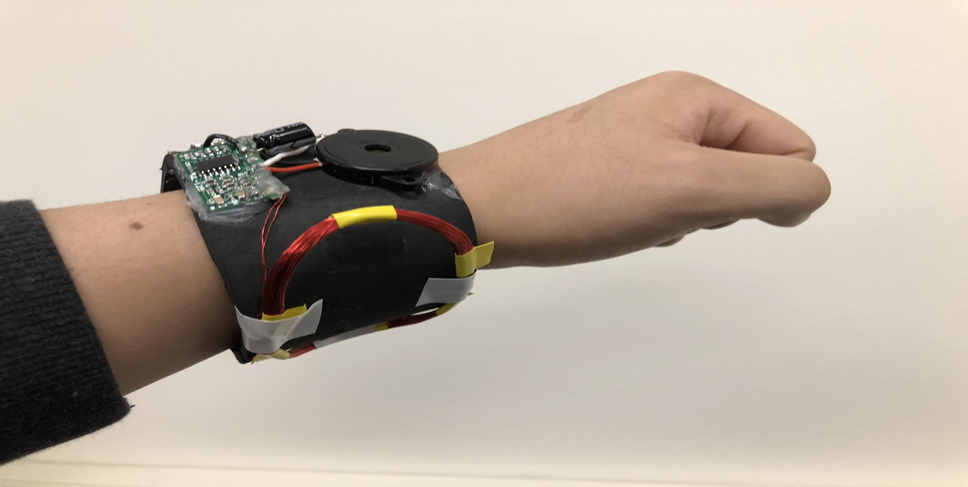
Figure 8: wristband with new geometry
Code Appendix
void read() {
    x = Serial1.read();
    if (x != -1) {
    if(i != 1 && i != 2 &&i != 3&&i != 12&& i!=13 ) {
        if (x>=48 && x<=57)
            x = x - 48;
        else
            x = x - 55;
        fi = fi << 4 | x;
        rx_buf[i] = 'A';
        rx_buf[i] = char(x) ;
        }
        i++;
        if (i == 14) {
        Serial.write(fi);
        Serial.println(" finished");
        //send the serial command to the server
        i = 1;
        }
    }
}